The Fundamental Variables of Paint Polishing:
By Christopher Brown of OCDCarCare Los Angeles – OCDCarCare.com
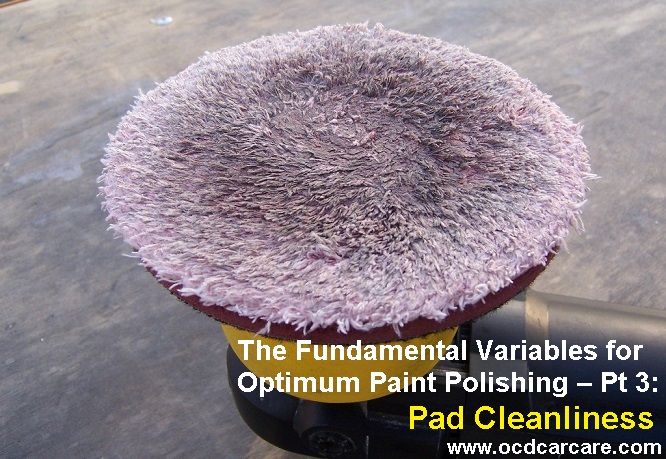
Pad Cleanliness – keeping the pad face free from unnecessary paint residue (removed paint) and used correction liquid. The cleaner the pad; the higher polishing efficiency becomes throughout all processes of paint polishing.
Pad Cleanliness is commonly THE MOST overlooked variables of paint polishing. However, a clean pad may arguably be one of the most important aspects of optimal paint correction.
A clean pad significantly cuts down time and labor during compounding stages. Yet, the greatest value of pad cleanliness is most noticeable in the final polishing steps.
During the final polishing (refinement) stages, detailers strive to achieve that wow factor balancing: shine, clarity, and definition of image. These optimum results cannot be achieved without maximizing pad cleanliness. Clean pads directly lead to the greatest refinement of a surface.
Examining the Benefits of Pad Cleanliness During Polishing
Pad Cleanliness is an essential concept for maximizing heavy compounding or final polishing stages during paint correction. Detailer polishing skills and capabilities will quickly plateau without addressing this variable. The major reasons for the effectiveness of a clean pad are as follows:
1] A clean unclogged pad, with optimal product quantity, allows the pad and correction liquid to work efficiently, maximizing corrective capabilities.
A clean pad is 100% available for optimal paint correction. A clean and fully primed pad delivers maximum product TO the surface, while also removing maximal amounts paint residue AWAY FROM paint. ‘Surgically clean’ is the best means of describing an optimal pad, which is for ready action.
2] A clean pad lessens the probability of embedded paint residue particles creating new defects in the working section.
A dirty pad, clogged with paint residue, causes defects (scouring) once it reaches a tipping point of too dirty. A clean pad, however, effectively collects and squeegees away paint residue AWAY from the polishing surface.
3] Clean pads always maximize paint correction efficiency and speed since the buffing components [pad movement and liquid] are working with maximum effectiveness.
A fresh pad recruits all available surface area to correct the working section. As correction progresses, less and less of the pad is available for optimum polishing due to residue build up. Therefore, frequent pad cleaning leads to quicker and more effective paint polishing.
Always Remember: CLEAN fixes Dirty… NEVER the other way around.
Why a Dirty Pad is Counterproductive to Paint Polishing
A few key points explain why dirty pads are ineffective and can inflict defects into paint.
A] Dirty pads greatly diminish cutting capability.
When a pad gums up, it is unable to hold and disperse clean correction liquid, drastically lowering the pad’s cutting ability. It is also unable to accept paint residue.
B] The longer a pad is used without cleaning the harder it becomes, altering the flex characteristics of the pad.
A hardened pad will bog down easier with paint residue, lessening pad rotation. Hardened clogged pads also create defects on softer paint types due to this increased rigidness and accumulation of hard paint residue.
C] An unclean pad bogs down, increasing friction — which heats up surfaces quicker.
A pad full of paint residue and old product bogs down, negating the pad’s squeegee capabilities.
A super gummed up and heavy pad can greatly slow the rotation of a DA polisher.
D] Dirty rigid pads provide less pressure response, and build and retain heat faster.
A rigid clogged [foam] pad decreases the vertical flexibility of the pad, thus compromising the heat dispersal capabilities of the foam cells. Over abundant paint residue clogs the foam’s pores, blocking airflow through the hollowness of the foam pad. This causes heat retention INTO the pad, rather than dispersal, causing danger to the pad and panel.
How to Most Effectively Clean a Pad With Air
By FAR, the most effective way to maintain pad cleanliness and fluffy fibers (microfiber), is with the use of compressed air after each working section.
To clean with air: simply lower the machine as close to the ground as possible. Orient the pad face up, with the machine and the furthest edge of the pad angled toward the ground. Using a concentrated nozzle tip, blow compressed [preferably 125-150 PSI] air into the outer most right side of the pad, which will begin rotating the pad on the machine. With a DA orbital: methodically move the air, starting from the outer area toward the center of the pad, then back. Starting with the outer area builds up a nice momentum pad speed, causing centrifugal force to force paint residue toward the ground.
This procedure is best performed over a drop cloth, towel, or outside. This contains or controls the spent residue which disperses directly toward the ground. Also, a container with water inside may be used to emulsify the product blown off the pad, effectively trapping residue in the water rather than becoming airborne.
How to Clean a Pad Without Air
Spray distilled water and gently brushing the pad with a soft bristled brush will help loosen embedded product and debris from the pad or microfiber. Place the machine face down into the clean microfiber and switch it on for a few seconds. This will transfer the residue from the pad surface to the cleaning microfiber cloth.
This method will not completely clean or remove all residue from the pad. Therefore, change pads more frequently when not cleaning with air.
Fresh pads ensure the highest level of paint correction. For most vehicles plan on using a minimum of 4 fresh pads to ensure optimal polishing. On finicky paints, plan on a few more or consider using multiple brand new pads, even when utilizing compressed air.
Why Pad Cleanliness is Effective and Essential
Paint Correction is the Religion of Residue Management.
During compounding (cutting), residue control helps to quickly even the surface since only the compounding liquid interacts with defects, knocking down the peaks of the defects.
If the pad is clogged with paint residue, then the available surface area for a compound is lowered.
During finish polishing (refinement) if pad cleanliness not a priority, residue buildup is most noticeable. This is the frustration provided via micro defects such as hazing or micro-marring.
In the final stage of the paint correction; clarity, gloss, and definition of image show off all of the hard work of the entire process. This is point in the process where hazing can occur.
This stage is critical since only the finest particles of polish should interact with the paint. When paint residue embeds within the pad face, it creates defects on the painted surface, hindering refinement.
Closing Thoughts on Pad Cleanliness
Pads need cleaning after each working section to maximize correction and finishing capabilities. Cleaning frequency is mostly dictated by the overall level of defects present in the surface and the paint type. This is a judgment call for the detailer based on paint dynamics.
However, cleaning a pad, more often than not, is a practice that benefits all stages of polishing.
Using compressed air, the process of cleaning of a pad and reloading of product takes about 30 seconds. So, arguments claiming it wastes too much time pale in comparison to the positive benefits a clean pad provides.
In the end, overlooking pad cleanliness will result in a correction stagnation for any detailer. They will be unable to overcome challenges in the face of many common correction situations which frequently occur.
© Christopher Brown – OCDCarCare Los Angeles – OCDCarCare.com – 2013
Click here if you missed Pt. 1 & 2 of the series: The Fundamental Variables for Optimal Paint Polishing
For more interesting topics on: auto detailing, paint polishing, and car care please browse: OCDCarCare Los Angeles’s – Detailing Article Archive.

Christopher Brown operates OCDCarCare Los Angeles, specializing in Ceramic Nano Coatings and Auto Detailing Training Courses.
His passion & dedication to car care lead to writing in-depth articles about detailing. In 2014, in-depth detailing training courses began, empowering detailers to gain high-level business & technical knowledge, hands-on skills, confidence, and highly consistent results. These traits enable detailing businesses to elevate their quality, efficiency, and profits in any market or business model.
► For Auto Detailing Training Courses or Service Inquiries or Fill out a Contact Form
►Follow OCDCarCare on: Instagram & Facebook
Latest posts by Christopher Brown (see all)
- Vehicle Water Spots Explained: Formation, Removal, & Prevention - 28 August, 2023
- Automotive Paint Thickness Gauge (PTG): Detailing User Guide - 2 September, 2022
- 5 Thin Automotive Paint Layers Explained For Detailing - 10 July, 2022